... a little movie I made for Christmas and New years :) Enjoy!
P.S. And yes, I am aware that christmas is over ;) I just had to show you what my camera and I did (is it me and my camera or the other way around. Yuck- correct grammar).
http://www.youtube.com/watch?v=qf4J0Z3Svcc

Sunday, February 27, 2011
Friday, February 25, 2011
My day.
Hey! I thought I might share some photos of what my day was like. Well, really only when went with Olivia to her ballet class.


A handmade hair bow I bought at some market.


The teacher
I hope your Friday was just as interesting!
PS! Today I sold my first item on etsy :)))
Wednesday, February 23, 2011
Henna Tutorial-What to do!
Henna. What is it? It is "the powdered leaves of a tropical shrub, used as a dye to color the hair and decorate the body." It looks like clay and dirt combined and it smells like hay.
Henna is a fun way to create your OWN tattoos that will go away in 1-2 weeks time! There are MANY fun and beautiful indian designs that you can use, or you can create your own! LETS BEGIN!
Ok, for this project, you will need:
-Henna powder (it can be purchases at almost any indian food store!)
-Lemon juice (we ran out of lemon juice, so I ended up using lime juice and so far, it is working!)
-Sugar, just plain old white sugar, not powdered
-Ziplock bag
-Lots of patients :)
*NOTE! Before you begin, take a look at your henna powder. Does it have little sticks in it? If so, you need to sift them out. To do this, just get a nylon use it to sift the henna. (Confused about this step? Just google it!) The henna I used was all smooth and powdery so I didn't need to do this step.
ALSO! Henna will stain, so get into good clothes if your going to get messy, or just be supper careful!

Begin with mixing the henna paste in a 5 to 1 ratio with sugar. Henna (5) to sugar (1).

Mix with lemon juice until it becomes to a pasty mashed potato substance. Make sure you get out any lumps!

Once you have mixed it up with the lemon juice, spoon it into a ziplock. I used a sandwich sized one.

Use your fingers to push out any air. Note how I pushed mine into a corner.

CAREFULLY twist the top and put a rubber-band around it to hold it in place.
ALMOST DONE!!! Now let it sit in a dark place for 24 hours. Ugg- this is where patients come in :P

While your waiting, come up with a pattern! After waiting for so long, cut the tip of the ziplock back (VERY SMALL) and apply to a clean hand. Let sit for an hour or longer. Often people say they leave it on for like 10 hours, but I think an hour works fine :)
*During the summer, you only need to leave it for like 30 mins! It's because it is warmer and the dye is released quicker.

You can then scrape it off with your finger nail. Try not to get it wet for an hour! It will darken within the next 12 hours!
Tuesday, February 22, 2011

Versatile Blogger Award.
Thank you Miss WobiSobi :) for giving me the Versatile bloggers
BUT! Sadly I don't have much time to go to a bunch of blogs today to award them today, but I will let you go check out WobiSobi's blog, so you know how to play!
Thanks again!
(OH YA! New tutorial coming SOON on how to make Henna and what todo with it!
Monday, February 21, 2011
Le Tablier de Cinderella (the Cinderella apron)
Well, we went BACK to the antique market because I just HAD to buy some more ribbon. I can never have enough ribbon :) But I then made another fancy apron! The great thing about these aprons is that you can actually wipe your hands on them because they are a dish rag! Another great thing is that they are hand dyed. Awesome right? The lady that sold me all of the stuff was soo sweet! Sadly I forgot to get a card :(


BUT! Without further ado...


My -um- modeling skills :P
Working on it!

Sunday, February 20, 2011
Le Tablier de Fantaisie (the fancy apron)

Over the weekend, I made a fancy apron out of a dishrag that I bought at a antique festival for $3. BARGAIN!

Fancy, Fancy? :) I put some pearls on it and some bows. The fabric and ribbon is all hand dyed!!!

Now I need to make a petticoat... :)
Saturday, February 19, 2011
Paper Roses
How was your week? Mine was busy and crazy and filled with homework. Yuck. We had to do a speech a bit ago about "If I were leader of the free world, the first issue I would address would be..." well, I chose to help people differently, but now I wish I had chosen to outlaw homework. Yes. OK! Well, I am working on some TUTORIALS and a GIVAWAY (coming up next wednesday on the Funky Polkadot Giraffe! Err- I have never done one so...
ANYWHO! Here is what I made on Sunday night with my friend Hayden:


LOOK here soon to see some new tutorials!
ANYWHO! Here is what I made on Sunday night with my friend Hayden:

Hayden made this one...

I made this one...

Hayden made this one...

And I made this one.
Did ya see how mine were all smaller? I was goofing off to much to be productive :D
But ya wana make these em? GO HERE: http://findinspirations.com/2009/07/handmade/ and HERE: http://craftberrybush.blogspot.com/2010/11/paper-romance.html
LOOK here soon to see some new tutorials!
Sunday, February 13, 2011
Vintage Rosette Tutorial

This is a tutorial on how to make a vintage rosette. There are many tutorial out there to make rosettes, but they often just come out looking like a roll of fabric. This tutorial will teach you how to make a rosette that will anyone will love!
OK! To start off- You Need:
~A glue gun
~Some silky fabric that is not 100% silk. Regular cotton will work too, but then you wont get that fancy frayed look.
~A measuring thingie
~Fake, but really looking pearls

Begin by cutting a long strip of you chosen fabric with its width 2 inches. Plug your glue gun in.

Take the end of your fabric and glue it in a scrunch kinda form. I folded the fabric in half, glued it, then folded it again in half.

Bregan twisting the fabric, with making sure that the good part of the fabric (in may case, the silky part) is on the outside of the twist most of the time. For now, just ignore any stray strings that appear.
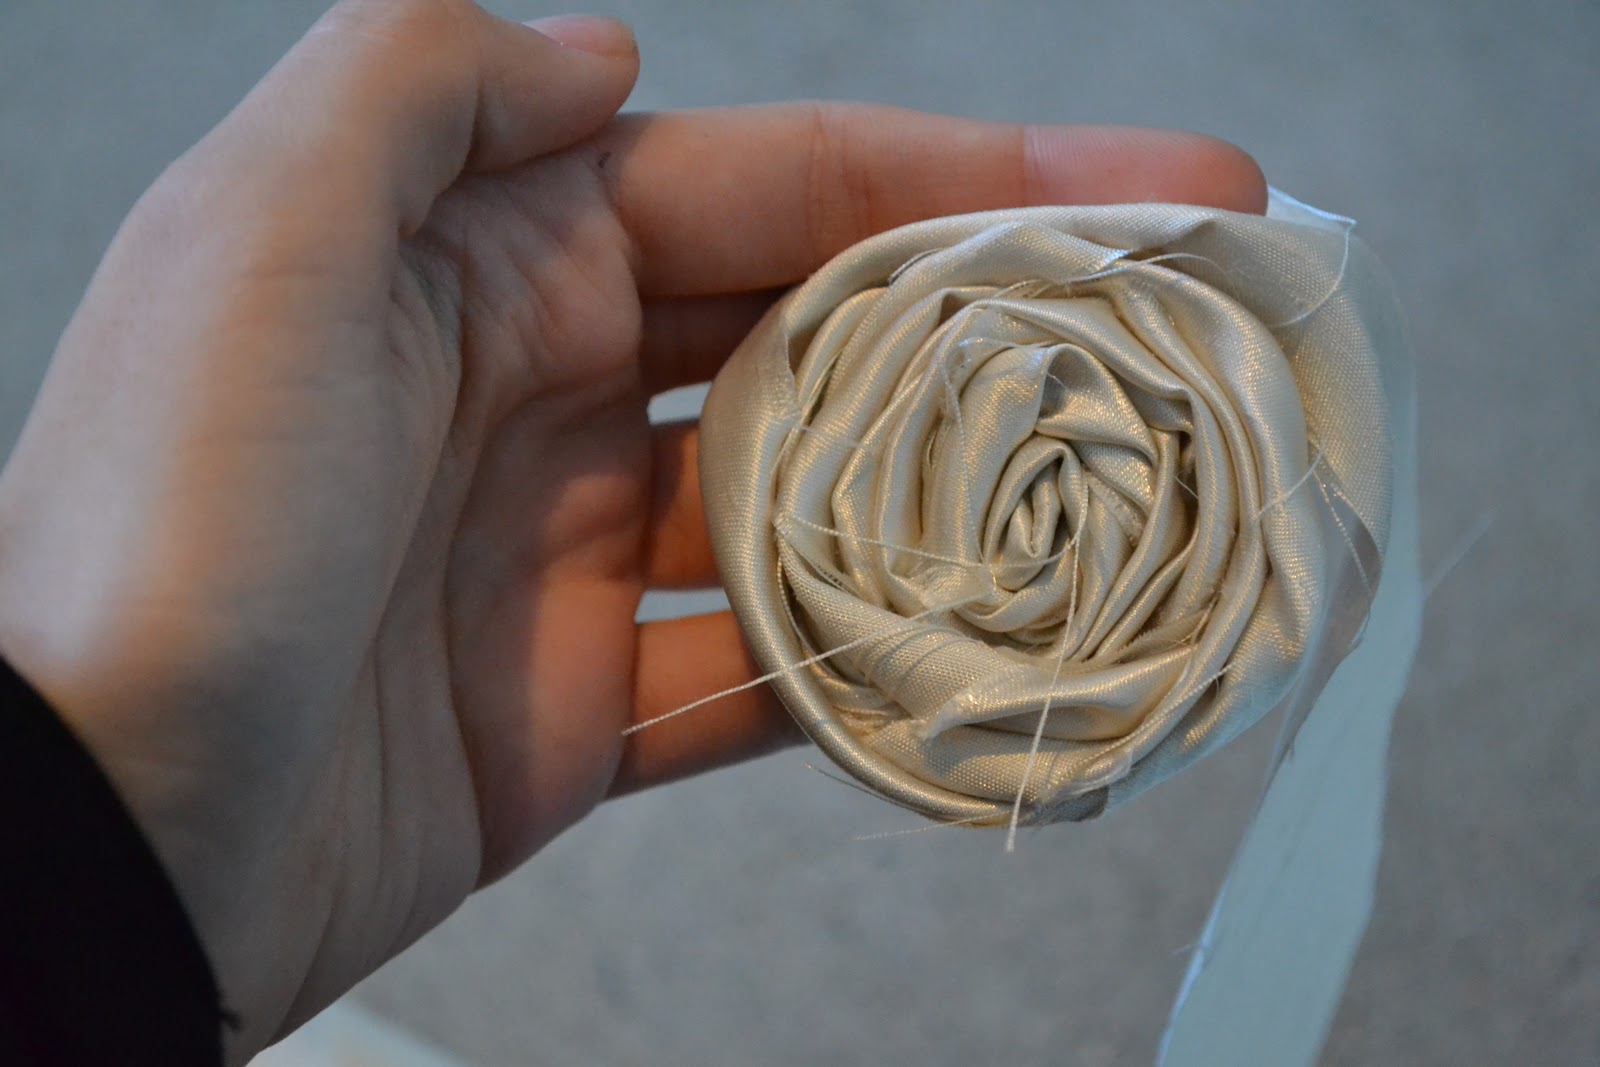
Keep rolling... ok done! Now, just fold the fabric left under the flower to "close it up," even though there really is nothing to close...

How ever you want to do your hair pin, or bobby pin, you can do. I took a oval piece of scrap fabric (felt works) and cut a little slit, then entered the clip. The photo is showing the good side of the clip

Now just glue that on to the back! In the photo, you can see that I hot glued some pearls on to the front. I don't like how the hot glue cam out, so next time I will hand sew the pearls on. It's your choice! :)

Did I mention that my favorite snack right now is mini marshmallows, cranberries, and gold fish all together?
Saturday, February 12, 2011
New glasses! (and Purse!)
 Hello! I got new glasses! Yes, big black glasses. I was going to settle on Ray bans but they tickled my nose and it made me nauseous.... oddly enough :P


Thursday, February 10, 2011
CHINA!
I am sooo excited for this upcoming China trip! Only a month left! My grandmother emailed me that I need to bring 30 little gifts for the students at a little school we'll be visiting. Not made in china ;) but maybe handmade.... Ideas?! I need to make something that both boy or girl could use.
Monday, February 7, 2011
Apple Purse


The finished product! My inspiration was the gathered clutch! I didn't use a pattern though.
:) :) :) Fun right? What do you think of the fabric? i Love it!

Saturday, February 5, 2011


Friday, February 4, 2011


Subscribe to:
Posts (Atom)